Battery switch on travel trailer function is crucial for managing your RV’s power. Understanding how this seemingly simple switch works can prevent frustrating breakdowns and keep your lights on (and your fridge cold!). This guide breaks down the different types of switches, how to safely connect and disconnect batteries, and how to troubleshoot common problems. We’ll even cover essential maintenance tips to keep your system running smoothly for years to come.
From single to dual battery setups, we’ll explore the intricacies of each, explaining the internal mechanisms and demonstrating the proper operation for optimal power management. We’ll cover safety precautions, troubleshooting steps, and the interaction of the battery switch with other key RV electrical components like converters and inverters. Get ready to become a battery switch pro!
Understanding Battery Switch Functionality in Travel Trailers: Battery Switch On Travel Trailer Function
A battery switch is a crucial component in a travel trailer’s electrical system, allowing you to manage and control the flow of power from your trailer’s batteries. Understanding its function and operation is essential for safe and efficient use of your RV. This ensures you can utilize your house batteries, charge them correctly from shore power or your vehicle, and prevent accidental draining or damage to your electrical system.
The primary purpose of a battery switch in a travel trailer is to isolate or connect different battery banks (typically a house battery bank and a starting battery for your tow vehicle) to various electrical systems within the trailer and to external charging sources. This prevents accidental discharge of one battery bank by another and provides control over which systems are powered.
It also helps protect your batteries from overcharging or discharging, extending their lifespan.
Types of Battery Switches
Several types of battery switches cater to different needs and setups. A single battery switch controls a single battery bank. This is suitable for smaller trailers with only one battery. Dual battery switches, on the other hand, allow you to independently control two separate battery banks, often a house battery bank and a starting battery. This setup offers greater flexibility and control over power distribution.
More complex systems might incorporate multiple switches or sophisticated battery management systems (BMS) for more advanced control and monitoring.
Internal Workings of a Battery Switch
A typical battery switch is essentially a multi-position rotary switch. Inside, it uses heavy-duty contacts to make and break the connections between the batteries and the various circuits in the trailer. The switch’s different positions typically include “Off,” “Battery 1,” “Battery 2,” and sometimes a “Both” position. Each position connects the designated battery or batteries to the trailer’s electrical system, while the “Off” position completely disconnects the batteries, preventing any power drain.
So, you’re an audiophile who travels? Awesome! Make sure you check out this guide on audiophile travel setups to keep your ears happy on the go. It’s crucial to protect your investment, and that means having the right insurance. Consider getting a quote from Aon travel insurance before you jet off; you’ll sleep better knowing your gear is covered.
Peace of mind is priceless, especially when you’re carrying around thousands of dollars worth of audio equipment!
The switches are usually designed to handle significant amperage, ensuring safe operation.
Operating a Battery Switch
Operating a battery switch is straightforward, but safety precautions are paramount. Before attempting any operation, always ensure the switch is in the “Off” position.
- Identify the Switch: Locate the battery switch, typically found near the battery compartment or inside a dedicated electrical panel.
- Understand the Positions: Familiarize yourself with the positions on the switch (Off, Battery 1, Battery 2, Both). Consult your owner’s manual if unsure.
- Turn the Switch to “Off”: Always start with the switch in the “Off” position to completely disconnect the batteries.
- Select the Desired Position: Turn the switch to the desired position: “Battery 1” to use only the first battery bank, “Battery 2” for the second, or “Both” to use both.
- Verify Power: After changing the switch position, verify the power is on in the intended circuits.
Remember to always consult your trailer’s owner’s manual for specific instructions and safety guidelines related to your particular battery switch and electrical system.
Connecting and Disconnecting Batteries
Connecting and disconnecting your RV batteries to the battery switch is a crucial task for managing your power supply. Doing it correctly ensures the safety of you and your equipment, and prevents damage to your batteries and electrical system. This section details the best practices and safety measures involved.Proper battery connection and disconnection is essential for maintaining the longevity and performance of your RV’s battery system.
Neglecting these procedures can lead to corrosion, premature battery failure, and even dangerous electrical hazards.
Battery Connection and Disconnection Best Practices, Battery switch on travel trailer function
Always disconnect the negative (-) terminal first when removing a battery from the system, and reconnect it last when installing a battery. This helps prevent accidental shorts and sparks. When connecting or disconnecting, use appropriate tools such as wrenches or battery terminals, avoiding any metal-on-metal contact that might cause sparks. Clean battery terminals with a wire brush before connecting to ensure a good, clean connection.
Apply a corrosion inhibitor to the terminals after cleaning to prevent future corrosion. Ensure all connections are tight to avoid voltage drops. Never force a connection.
Safety Precautions When Working with RV Batteries
RV batteries contain corrosive acid and can produce explosive hydrogen gas. Always wear safety glasses and gloves when handling them. Work in a well-ventilated area to avoid inhaling fumes. Never allow open flames or sparks near the batteries. Before working on the battery system, turn off any connected appliances to prevent accidental shorts.
If you spill battery acid, neutralize it immediately with baking soda and water, and clean the area thoroughly. If you are unsure about any aspect of the process, consult a qualified RV technician.
Flowchart for Switching Between Battery Banks
The following flowchart illustrates the process of switching between your RV’s battery banks using a battery switch. Assume a two-bank system (Battery Bank 1 and Battery Bank 2).[Imagine a flowchart here. The flowchart would begin with a box labeled “Start”. It would then branch to two boxes: “Connect to Battery Bank 1” and “Connect to Battery Bank 2”.
Each of these boxes would lead to a box labeled “Check Appliances”. A yes/no decision point would then ask if appliances are functioning correctly. If yes, the flow would lead to a box labeled “End”. If no, a troubleshooting step would be added before leading back to the “Check Appliances” box. Arrows would indicate the flow between each step.
The flowchart would visually represent the steps involved in selecting which battery bank powers the RV.]
So, you’re an audiophile who travels? Awesome! Check out this guide on building the perfect audiophile travel setup to keep your ears happy on the go. Don’t forget to sort out your travel insurance beforehand; getting Aon travel insurance is a good idea for peace of mind, covering those expensive headphones in case of accidents.
That way, you can relax and enjoy your tunes wherever your adventures take you!
Comparison of Battery Connection Methods
| Method | Advantages/Disadvantages |
|---|---|
| Direct Connection (no switch) | Advantages: Simple setup. Disadvantages: No ability to isolate batteries, increased risk of accidental discharge, potential for parasitic drain. |
| Battery Switch (1-2-both-off) | Advantages: Allows isolation of batteries, prevents parasitic drain, ability to switch between banks. Disadvantages: Slightly more complex setup, potential for switch failure. |
| Battery Switch with Separate Charging | Advantages: Independent charging of each bank, better battery management. Disadvantages: More expensive setup, more complex wiring. |
Battery Switch and Electrical System Integration
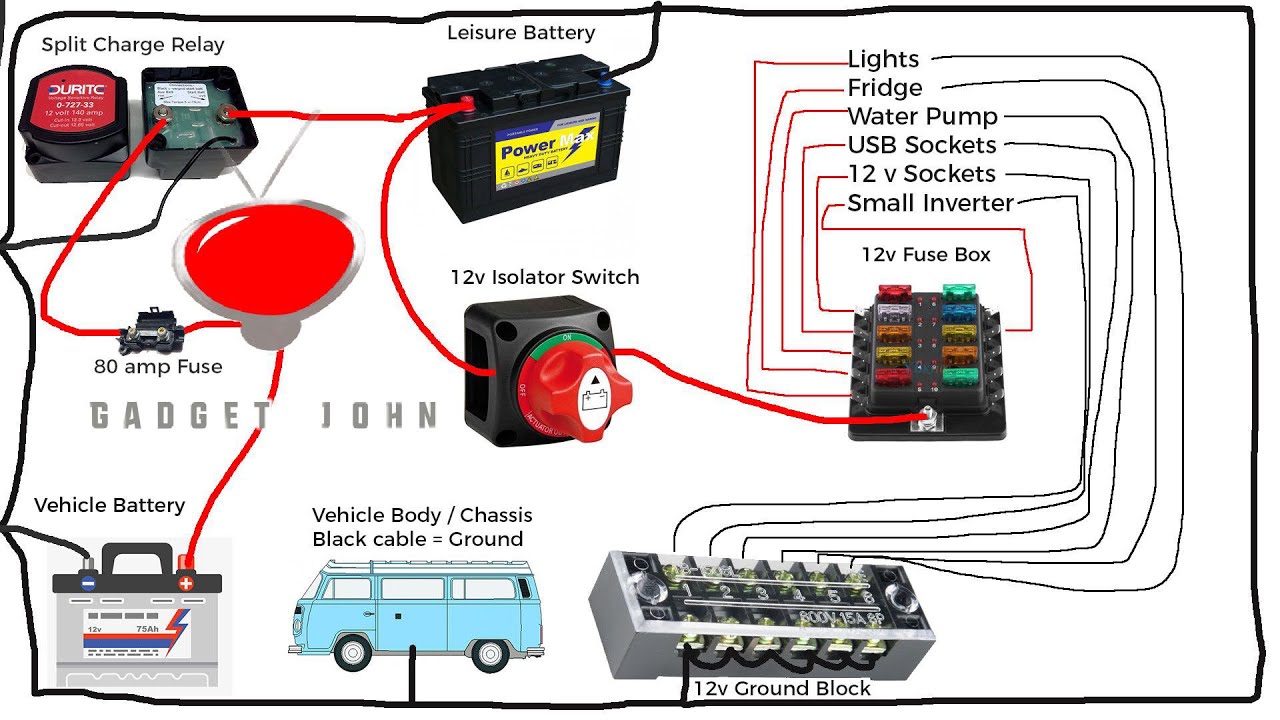
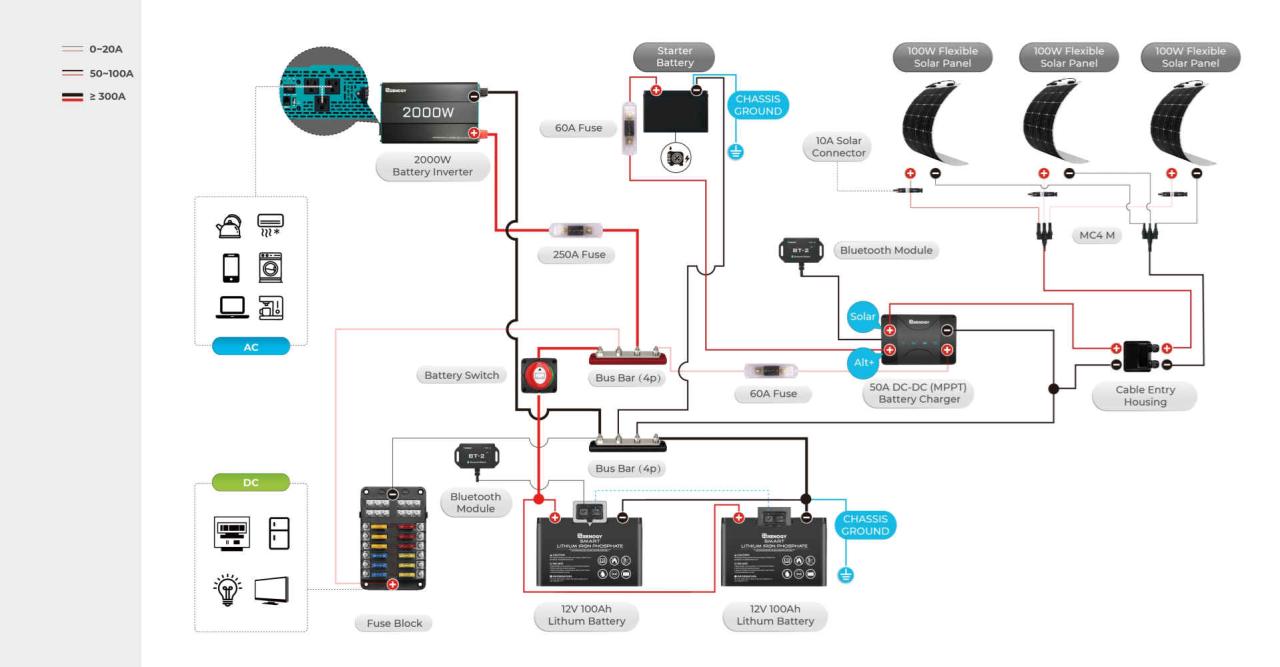
Your battery switch is the central nervous system of your travel trailer’s power distribution. It controls the flow of electricity from your batteries to the rest of your RV’s electrical components, ensuring that everything runs smoothly and safely. Understanding how it interacts with other systems is crucial for preventing damage and maximizing your RV’s power capabilities.The battery switch acts as a gatekeeper, directing power from your batteries (house and chassis) to various parts of your electrical system.
It works in conjunction with your converter, which converts 12-volt DC power from your batteries to 120-volt AC power for your household appliances, and your inverter, which does the opposite – converting 120-volt AC power to 12-volt DC power for certain devices. The switch allows you to select which battery bank powers which system, or to disconnect the batteries entirely for safety.
Power Flow Management
The battery switch’s primary function is managing the flow of power. With the switch in the “house” position, the house batteries power the interior lights, appliances, and other 12-volt DC systems. The converter then uses this power to create 120-volt AC power for your outlets. Switching to the “chassis” position allows the chassis battery to power the vehicle’s starting system and any 12-volt accessories connected to the chassis.
The “off” position completely disconnects the batteries from the rest of the system, preventing accidental discharge and protecting your batteries from potential damage. Some switches offer a combined position to utilize both battery banks simultaneously. This setup is common in larger RVs with high power demands.
Power Flow with Different Battery Banks
When the switch is set to the “house” position, the house batteries provide power for the 12-volt DC systems in the living area of the trailer (lights, water pump, etc.). The converter uses this power to create 120-volt AC for the outlets. The chassis battery remains isolated, preserving its charge for starting the tow vehicle. Conversely, selecting the “chassis” position routes power solely from the chassis battery, primarily used for starting the vehicle’s engine and powering any 12-volt accessories directly connected to the chassis.
In the “both” or “combined” position (if available), both batteries supply power to the house system, providing greater capacity and longer run times. However, this configuration necessitates careful monitoring of the state of charge of both batteries to prevent deep discharge and damage.
Battery Switch Circuit Fusing
Proper fusing of your battery switch circuit is paramount for safety. The fuse acts as a sacrificial element, protecting the wiring and components from overcurrent situations. The appropriate fuse rating depends on the amperage capacity of your battery switch and the wiring gauge. Always consult the manufacturer’s specifications for your specific battery switch and wiring to determine the correct fuse size.
A fuse rated too low will blow frequently, while a fuse rated too high won’t offer adequate protection. For example, a 100-amp battery switch might require a 100-amp fuse, but this needs to be confirmed against the manufacturer’s guidelines. Incorrect fusing can lead to overheating, fire hazards, and damage to your electrical system. Never attempt to bypass or replace a fuse with a higher amperage rating than specified.
Mastering your travel trailer’s battery switch is key to a worry-free RV experience. By understanding its function, performing routine maintenance, and knowing how to troubleshoot common issues, you’ll be equipped to handle any power situation. Remember, safety is paramount – always disconnect batteries before working on the system. With a little knowledge, you can confidently manage your RV’s power and enjoy the open road!
User Queries
What happens if I leave my battery switch on all the time?
Leaving your battery switch on constantly can drain your batteries, especially if you’re not using your RV frequently. It’s best to turn it off when not in use to conserve battery life.
My battery switch is on, but I have no power. What should I check?
Check your fuses, both at the battery switch and elsewhere in your RV’s electrical system. Inspect battery connections for corrosion or looseness. Also, ensure your batteries are charged.
How often should I clean my battery switch terminals?
Clean your battery switch terminals at least once a year, or more often if you notice corrosion or buildup. This helps ensure a good electrical connection.
What type of battery switch is best for my travel trailer?
The best type of battery switch depends on your specific needs. A single switch is sufficient for one battery, while a dual switch is needed for two. Consider your power demands and future expansion plans.
